
I realized recently that I had been going about it the wrong way! I like decorating with vintage things, so why not apply that to Valentine's Day as well?
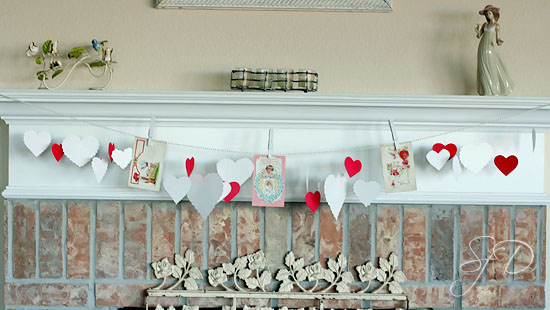
This weekend I finished putting together a Valentine garland to hang on my mantle.
If you like it, then keep reading!
I'm going to tell you how I did it so you can do something like it too.
Vintage Valentine Garland Tutorial
Supplies:
3 vintage valentine postcards
try on etsy, in antique malls, possibly ebay...
strand of faux craft pearls (the kind that come in a roll)
you could also use ribbon or yarn
clear packing tape
3 clothespins
white spray paint (matte)
graduated heart cookie cutters
or
a heart template printed out at varied sizes... you can copy/paste the heart outline into a Word document, then enlarge or shrink it with the tabs on the edges of the image, then repeat three more times to get 4 different sizes of hearts on one page
several sheets of white and red cardstock
decorative scissors
regular scissors
white sewing thread
elmer's glue
Step One
Lay the clothespins on some newspaper and paint with spray paint. Do this in a well-ventilated area. Use light coats, and let each coat dry before turning to spray another angle. Let dry for an hour or so.
Step Two
Trace 16 to 20 hearts on white cardstock, using the different sizes of cookie cutters/templates. Cut out with the decorative scissors.
Trace 8 hearts on red card stock, using a smaller cookie cutter/template. Use regular scissors to cut them out.
Lay all hearts out on a table. Cut 10" pieces of sewing thread for the number of hearts you cut out. Put a dab of elmer's glue at the top center of each heart. Put the end of a piece of thread in the glue dot, ensuring that it lays flat against the cardstock. Let dry until all glue dots become clear.
Step Three
Using a small piece of packing tape, affix one end of the faux pearl strand to the top of your mantle. Drape it across the front of the mantle, tape the end of the correct length to the other end of the mantle, and then cut off the excess.
You could always use tacks, nails, or hooks to hang this up, I just don't like putting extra holes in the wood of my mantle. If you're hanging this somewhere else, like a wall, then tacks or hooks would be a better option.
Step Four
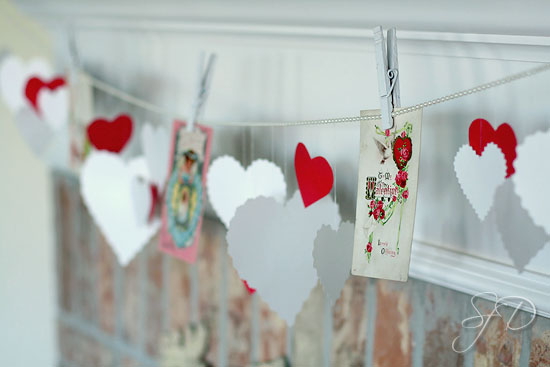
Hang up the Valentine postcards with the painted clothespins. Start with the one in the center by eyeballing up where the center is. Then hang the other two on either side of the center, spaced evenly.
Step Five
Divide the hearts evenly up into four groups - each group with at least one large white heart, several of the smaller sized white hearts, and two red hearts.
I've given you lots of extra length with the threads attached to the hearts, for easy manuevering and for adjusting to different lengths for each heart. I hung different hearts at different lengths for a casual, varied look. Have fun with it, don't make it too complicated for yourself.
I used a simple double knot to tie the thread when I was sure the placement and length was what I wanted.
Start with the largest white heart cutouts, tie them onto the pearl strand, spacing them evenly in the four spaces (two fall between the Valentines and two are on the outsides past the Valentines.) Then add the next largest size, then the smaller sizes. Next, tie the the two red hearts at regular intervals in the four spaces. Cut the tail ends of the threads within 1/4" of the knot.
Step Six
Step back and take a look at your beautiful garland!
Please take a picture and share it with us by leaving a link in the comments so we can see your work - I'd love to see!

I just had a thought -
if I roll this up carefully after V-day and store it, it will be easy to put back up next year...
5 comments:
I love it!!! It looks great:)
I am absolutely in LOVE with this. Just LOVE it.
I must try something like this.
How fun! I love Valentines Day and was just pondering a craft I could do with the chickadees. Thanks!
Your Valentines look wonderful!
Great creativity.
LOVE LOVE this. Used the picture in my blog today! everydaylovelys.blogspot.com
Post a Comment